
슈코딩
jQuery & Ajax 본문

1. jQuery
-jQuery 는 미리 짜둔 Javascript의 라이브러리이다. ( CSS의 부트스트랩과 동일성향 )
-> 길고 복잡한 Javascript 를 직관적이게 쓸 수 있게 된다.
-jQuery 는 아래의 코드를 html에 넣어야 사용할 수 있다.
<script src="https://ajax.googleapis.com/ajax/libs/jquery/3.5.1/jquery.min.js"></script>
-jQuery는 아래코드처럼 작성을 한다. (예시)
$('#명칭').명령어();
-Javascript 때 명칭을 지칭하던 class 가 jQuery에선 id 로 지칭한다. (예시)
<div class="mypost" id ="post-box">
<div id="cards-box" class="row row-cols-1 row-cols-md-4 g-4">
위의 포스트 박스와 카드 박스를 토대로 기능을 적용 해보면
#감추고 나타내기
감추기 : $('#post-box').hide()
나타내기 : $('#post-box').show()
#포스팅 카드 이어붙이기
! 이어 붙일땐 let temp_html = ` ` 을 작성하고 ` ` 안에 이어붙일 코드를 복사 후 붙여넣기 한다.
붙이기 : $('#cards-box').append(temp_html)
2. 서버-클라이언트 통신
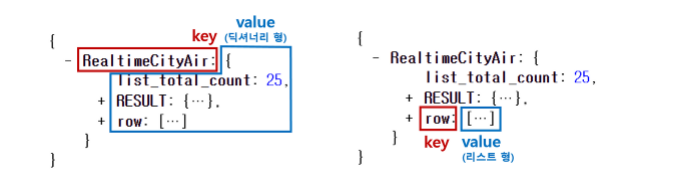
- 서버는 JSON 형식으로 클라이언트에게 데이터를 보내준다.
-JSON은 key:value 형식으로 이루어져있다. ( 딕셔너리와 유사하다 )
#API = 은행창구 역할 !
클라이언트 -> 서버 요청시 2가지 보편적인 타입이 존재 ( 이외에도 여러가지 타입이 있지만 우리가 알아야할 건 두가지 )
GET -> 데이터 조회 (Read)
POST -> 데이터 생성, 변경, 삭제 요청시 ex) 회원가입, 회원탈퇴, 비밀번호 변경
3. Ajax
- 서버와 클라이언트가 통신하는 수단?
#Ajax의 기본 골격
$.ajax({
  type: "GET",
  url: "여기에URL을입력",
  data: {},
  success: function(response){
    console.log(response)
  }
})
-type : 요청하는 방식
-url : 데이터를 가져올 주소를 적는다. ex) 미세먼지 Open API
-data : GET 요청시엔 비워둔다.
-function(response) {} : 중괄호 안에 반복문을 이용해 가져오고 싶은 데이터만 추출한다.
$.ajax({
  type: "GET",
  url: "http://spartacodingclub.shop/sparta_api/seoulair",
  data: {},
  success: function (response) {
    let rows = response["RealtimeCityAir"]["row"];
    for (let i = 0; i < rows.length; i++) {
      let mise = rows[i];
      let gu_name = mise["MSRSTE_NM"];
      let gu_mise = mise["IDEX_MVL"];
      console.log(gu_name, gu_mise);
    }
  }
});
이처럼 코드를 작성하면 구의 이름과 그 구의 미세먼지값만 추출할수가 있다.
#Ajax 연습
p-1. 따릉이 OpenAPI 이용해서 서울시 위치별 따릉이 현황 데이터 가져오기
<!doctype html>
<html lang="ko">

<head>
    <meta charset="UTF-8">
    <title>JQuery 연습하고 가기!</title>
    <!-- JQuery를 import 합니다 -->
    <script src="https://ajax.googleapis.com/ajax/libs/jquery/3.4.1/jquery.min.js"></script>

    <style type="text/css">
        div.question-box {
            margin: 10px 0 20px 0;
        }

        table {
            border: 1px solid;
            border-collapse: collapse;
        }

        td,
        th {
            padding: 10px;
            border: 1px solid;
        }

        .urgent {
            color : red;
        }
    </style>

    <script>
        function q1() {
            $('#names-q1').empty()
            $.ajax({
                type: "GET",
                url: "http://spartacodingclub.shop/sparta_api/seoulbike",
                data: {},
                success: function (response) {
                    let rows = response['getStationList']['row']
                    for (let i = 0; i < rows.length; i++) {
                        let name = rows[i]['stationName']
                        let rack = rows[i]['rackTotCnt']
                        let bike = rows[i]['parkingBikeTotCnt']

                        let temp_html = ``

                        if (bike < 5) {
                                temp_html = `<tr class= "urgent">
                            <td>${name}</td>
                            <td>${rack}</td>
                            <td>${bike}</td>
                        </tr>`
                        }else {
                            temp_html = `<tr class>
                            <td>${name}</td>
                            <td>${rack}</td>
                            <td>${bike}</td>
                        </tr>`
                        }


                        $('#names-q1').append(temp_html)
                    }

                }
            })
        }
    </script>

</head>

<body>
<h1>jQuery + Ajax의 조합을 연습하자!</h1>

<hr/>

<div class="question-box">
    <h2>2. 서울시 OpenAPI(실시간 따릉기 현황)를 이용하기</h2>
    <p>모든 위치의 따릉이 현황을 보여주세요</p>
    <p>업데이트 버튼을 누를 때마다 지웠다 새로 씌여져야 합니다.</p>
    <button onclick="q1()">업데이트</button>
    <table>
        <thead>
        <tr>
            <td>거치대 위치</td>
            <td>거치대 수</td>
            <td>현재 거치된 따릉이 수</td>
        </tr>
        </thead>
        <tbody id="names-q1">
        </tbody>
    </table>
</div>
</body>

</html>
p-2. 랜덤 르탄이 API 이용해서 업데이트시마다 새로운 이미지 데이터 가져오기
<!doctype html>
<html lang="ko">
<head>
    <meta charset="UTF-8">
    <title>JQuery 연습하고 가기!</title>
    <!-- JQuery를 import 합니다 -->
    <script src="https://ajax.googleapis.com/ajax/libs/jquery/3.4.1/jquery.min.js"></script>

    <style type="text/css">
        div.question-box {
            margin: 10px 0 20px 0;
        }

        div.question-box > div {
            margin-top: 30px;
        }

    </style>

    <script>
        function q1() {
            $.ajax({
                type: "GET",
                url: "http://spartacodingclub.shop/sparta_api/rtan",
                data: {},
                success: function (response) {
                    let url = response['url']
                    let msg = response['msg']

                    $('#img-rtan').attr('src', url)
                    $('#text-rtan').text(msg)
                }
            })
        }
    </script>

</head>
<body>
<h1>JQuery+Ajax의 조합을 연습하자!</h1>

<hr/>

<div class="question-box">
    <h2>3. 르탄이 API를 이용하기!</h2>
    <p>아래를 르탄이 사진으로 바꿔주세요</p>
    <p>업데이트 버튼을 누를 때마다 지웠다 새로 씌여져야 합니다.</p>
    <button onclick="q1()">르탄이 나와</button>
    <div>
        <img id="img-rtan" width="300" src="http://spartacodingclub.shop/static/images/rtans/SpartaIcon11.png"/>
        <h1 id="text-rtan">나는 ㅇㅇㅇ하는 르탄이!</h1>
    </div>
</div>
</body>
</html>
p-3. 2주차 숙제 ! 날씨 API 이용해서 1주차 숙제 제목아래 현재 기온 : 00.0도 데이터 가져오기
<!doctype html>
<html lang="en">

<head>
    <meta charset="utf-8">
    <meta name="viewport" content="width=device-width, initial-scale=1, shrink-to-fit=no">

    <link href="https://cdn.jsdelivr.net/npm/bootstrap@5.0.2/dist/css/bootstrap.min.css" rel="stylesheet"
          integrity="sha384-EVSTQN3/azprG1Anm3QDgpJLIm9Nao0Yz1ztcQTwFspd3yD65VohhpuuCOmLASjC" crossorigin="anonymous">
    <script src="https://ajax.googleapis.com/ajax/libs/jquery/3.5.1/jquery.min.js"></script>
    <script src="https://cdn.jsdelivr.net/npm/bootstrap@5.0.2/dist/js/bootstrap.bundle.min.js"
            integrity="sha384-MrcW6ZMFYlzcLA8Nl+NtUVF0sA7MsXsP1UyJoMp4YLEuNSfAP+JcXn/tWtIaxVXM"
            crossorigin="anonymous"></script>

    <title>스파르타코딩클럽 | 부트스트랩 연습하기</title>
    <style>
        * {
            font-family: 'Gowun Dodum', sans-serif;
        }

        .mytitle {
            background-color: green;

            height: 250px;
            width: 100%;

            background-image: linear-gradient(0deg, rgba(0, 0, 0, 0.5), rgba(0, 0, 0, 0.5)), url("https://images.chosun.com/resizer/TRylAoJ09lTz-DxqRkoC7Q5cmqA=/616x0/smart/cloudfront-ap-northeast-1.images.arcpublishing.com/chosun/IGUWJMF4RVAVNB4JXPDZLJME6Q.jpg");
            /*url 앞의 코드는 배경이미지를 어둡게 해준다*/
            background-position: top;
            background-size: revert;

            color: white;

            display: flex;
            flex-direction: column;
            justify-content: center;
            align-items: center;
            /*위에 4가지는 사진 안의 내용물을 가운데로 정렬하는 묶음*/
        }

        .card {
            max-width: 500px;
            width: 95%;
            margin: auto;
            margin-top: 15px;

        }

        .mypost {

            max-width: 500px;
            width: 95%;
            margin: 20px auto 0px auto;

            box-shadow: 0px 0px 3px 0px gray;
            padding: 20px;


        }

        .btns {
            margin-top: 10px;
        }

        .btns > button {
            margin-right: 10px;
        }

        .pink {
            color : deeppink;
        }
    </style>
    <script>
        $(document).ready(function(){
            $.ajax({
                type: "GET",
                url: "http://spartacodingclub.shop/sparta_api/weather/seoul",
                data: {},
                success: function (response) {
                    let temp = response['temp']

                    $('#temp').text(temp)
                }
            })
        });
    </script>
</head>

<body>
    <div class="mytitle">
        <h1>블랙<span class = "pink">핑크</span> 팬명록</h1>
        <p>현재기온 : <span id="temp">00.0</span>도</p>
    </div>
    <div class="mypost">
        <div class="form-floating mb-3">
            <input type="email" class="form-control" id="floatingInput" placeholder="name@example.com">
            <label for="floatingInput">닉네임</label>
        </div>
        <div class="form-floating">
                <textarea class="form-control" placeholder="Leave a comment here" id="floatingTextarea"
                          style="height: 100px"></textarea>
            <label for="floatingTextarea">응원댓글</label>
        </div>
        <div class="btns">
            <button type="button" class="btn btn-dark">응원 남기기</button>
        </div>
    </div>
    <div class="card">
        <div class="card-body">
            <blockquote class="blockquote mb-0">
                <p>새로운 앨범 너무 멋져요!</p>
                <footer class="blockquote-footer">호빵맨</footer>
            </blockquote>
        </div>
    </div>
    <div class="card">
        <div class="card-body">
            <blockquote class="blockquote mb-0">
                <p>새로운 앨범 너무 멋져요!</p>
                <footer class="blockquote-footer">호빵맨</footer>
            </blockquote>
        </div>
    </div>
    <div class="card">
        <div class="card-body">
            <blockquote class="blockquote mb-0">
                <p>새로운 앨범 너무 멋져요!</p>
                <footer class="blockquote-footer">호빵맨</footer>
            </blockquote>
        </div>
    </div>
</body>

</html>
이렇게 Ajax 를 반복연습하다보니 Ajax에 대한 이해도가 높아지고 더 다양한 응용을 해보고 싶다는 생각이 들었다.
jQuery와 Ajax 처음엔 정말 이해도 안되고 어려웠지만,
강의를 2번 3번 듣다보니 활용을 할 수 있게되서 도움이 많이되었다.
2주차 강의 숙제도 끝!
'코딩공부 > 웹개발' 카테고리의 다른 글
| Flask & 서버에 웹페이지 배포 (0) | 2022.04.25 |
|---|---|
| 웹동작의 개념부터 Javascript 까지 (2) | 2022.04.18 |

